|
|
You are here: Leader.IT>MasonSQL Web>DeployUbuntuPrecise (07 Sep 2023, GuidoBrugnara)Edit Attach
MasonSql 12_04 Installation on Ubuntu LTS (Precise Pangolin) on Proxmox servers 2_01
On this page:Installation of the Proxmox OpenVZ template
Install Virtual Machine
wget http://download.proxmox.com/appliances/system/ubuntu-12.04-standard_12.04-1_amd64.tar.gzCreate the VM with at least 2GB RAM and 512M of disk space; Proceed with the upgrade of the operating system and the installation of the package.
Install Packages
# Proceed with root privileges
sudo su -

# Locale settings
update-locale LC_ALL=it_IT.UTF-8 LANG=it_IT.UTF-8
locale-gen

# Time zone
dpkg-reconfigure tzdata

# Update packages
apt-get update
apt-get upgrade
apt-get dist-upgrade


## Packages needed to use MasonSQL

# Apache2 & mod_perl

# Ubuntu template already installed package apache2 apache2-mpm-prefork
apt-get install libapache2-mod-perl2 libapache2-request-perl
a2enmod apreq perl ssl

# Postgresql & Perl DBI, DBD::Pg
echo "deb http://apt.postgresql.org/pub/repos/apt/ precise-pgdg main" >/etc/apt/sources.list.d/pgdg.list
wget --quiet -O - https://www.postgresql.org/media/keys/ACCC4CF8.asc | sudo apt-key add -
sudo apt-get update
apt-get install postgresql-9.6 postgresql-client-9.6 postgresql-plperl-9.6 postgresql-contrib-9.6

# Perl DBI, DBD::Pg
apt-get install build-essential libpq-dev
cpan DBD::Pg
apt-get install libdbi-perl libapache-dbi-perl

# Various packages
apt-get install libjson-perl libautobox-perl libxml-simple-perl libclone-perl
apt-get install liblog-log4perl-perl libipc-run-perl
apt-get install libspreadsheet-writeexcel-perl libtext-unidecode-perl

# Mail::Sender
apt-get -y purge libmail-sender-perl
cpan Mail::Sender

# Mason
apt-get install libhtml-mason-perl

# ODT Report manager
apt-get install python-software-properties
sudo add-apt-repository ppa:libreoffice/ppa
sudo apt-get update
sudo apt-get upgrade
apt-get install libreoffice-writer
apt-get install pdftk
apt-get install file
# user auto registration
apt-get install libstring-random-perl

# Various packages available from CPAN
cpan String::Diff
cpan install App::cpanminus
# with new releases authentication not work
cpanm Apache2::AuthCookie@3.23
cpan SQL::Statement
cpan HOP::Lexer
cpan SQL::Dialects::ANSI
cpan SQL::Interpolate
cpan Sys::RunAlone
cpan MIME::Parser
cpan Archive::Tar::Wrapper
cpan Archive::Zip
cpan Perl6::Form
cpan HTTP::BrowserDetect
cpan IPC::Run::SafeHandles
cpan Text::Balanced
# user auto registration
cpan Captcha::reCAPTCHA
Install Database
You must then copy the/opt/masonsql/ replicating the folder from an already existing installation or by downloading from SVN and recovering dojo-toolkit 1.9.2 from the internet.
The latest version compatible with Ubuntu 12.04 is this: https://www.leader.it/wsvn/masonsql/tags/1.9.1
Proceed with the database installation using the forms in /opt/masonsql/utility/sql/ directory.
The create_database.sql creates the usernames used by the application. You have to change passwords which can then be shown in the configuration files. If necessary also modify the char-set declared during the the database creation.
cd /opt/masonsql/utility/sql
cat roles.sql | su -c psql\ postgres postgres
cat create_database.sql | su -c psql\ postgres postgres
cat pg_dump.masonsql.template.sql | su -c psql\ masonsql postgres
Change the database access permissions:
## file /etc/postgresql/9.6/main/postgresql.conf :
listen_addresses = 'localhost'
# Or if there is also an access from the local network:
listen_addresses = '*'

## file /etc/postgresql/9.6/main/pg_hba.conf
local masonsql all password
host  masonsql all        127.0.0.1    255.255.255.255 password
# If you access the LAN
host  masonsql all        192.168.1.0  255.255.255.0   md5

# Restart the server (after the listening socket has changed)
/etc/init.d/postgresql restart
Setup Environment
Setting up your environment for the installation of an application that uses the framework.mkdir /opt/demo_masonsql /opt/demo_masonsql/etc /opt/demo_masonsql/htdocs /opt/demo_masonsql/lib
chmod -R 750 /opt/demo_masonsql
mkdir /opt/demo_masonsql/archive /opt/demo_masonsql/tmp
chmod 770 /opt/demo_masonsql/archive /opt/demo_masonsql/tmp
mkdir /var/log/apache2/demo_masonsql
chmod 755 /var/log/apache2/
chmod 770 /var/log/apache2/demo_masonsql
chown root.www-data /var/log/apache2/demo_masonsql
# All files belong to the root user and www-data group
chown -R root.www-data /opt/demo_masonsql
cp -a /opt/masonsql/utility/example.apache2.demo_masonsql.conf /opt/demo_masonsql/etc/apache2.demo_masonsql.conf
# Edit the configuration file by adjusting the parameters: VirtualHost, SSLCertificateFile, SSLCertificateKeyFile
# ServerAdmin, ServerName, MailFrom, Auth_AC_Domain, DBIconnect, etc.
# Link to the Apache2 configuration folder
ln -s /opt/demo_masonsql/etc/apache2.demo_masonsql.conf /etc/apache2/conf.d/demo_masonsql.conf
# Insert the /etc/ crontab command to periodically empty the temporary files folder
echo "# svuoto file temporanei di Demo MasonSql
12 6 * * * root find /opt/demo_masonsql/tmp -maxdepth 1 -mindepth 1 -mtime +7 -exec rm -r '{}' ';'" >> /etc/crontab
Access the application using the username admin and password installa
ODT Reportman Installation
These instructions for installation were checked on Ubuntu Precise (12.04) and Ubuntu Trusty (14.04) with downgrade to Apache 2.2
Packages
These packages are prerequisite for the ODT Report Manager:apt-get -y install libxml-simple-perl cpan XML::Simple::Sorted cpan IPC::Run::SafeHandles cpan Text::Balanced
Perlbrew
Because ofODF::lpOD incompatibility with the Perl version 5.14, used by MasonSQL in some deployments, the Perlbrew must be installed to use a newer version of Perl. See the MasonSQL Configuration Matrix. To install Perlbrew, with all the necessary libraries, run following perlbrew-deploy.sh script as a
root user:
sudo /opt/masonsql/utility/perlbrew-deploy.sh
Libreoffice
# Proceed with root privileges.
sudo su -

# Install latest System.LibreOffice (5.0 or later).

# Ubuntu Precise (12.04)
apt-get install python-software-properties
# Ubuntu Trusty (14.04)
# apt-get install software-properties-common

sudo add-apt-repository ppa:libreoffice/ppa
sudo apt-get update
apt-get install openjdk-9-jre libreoffice-writer
# Se si utilizzano anche i file ODS
apt-get install libreoffice-calc
# Install pdftk.
apt-get install pdftk
Unoconv Daemon
Unoconv can be used by ODT Report Manager to convert.odt files to .pdf format.The
OdtConvEngine environment variable must be configured with "OdtConvEngine" as an alternative to "libreoffice".
# Proceed with root privileges.
sudo su -
# Install latest Unoconv.
cd /tmp
apt-get install git
git clone https://github.com/dagwieers/unoconv
cd unoconv/
make install
cd ../
rm -rf unoconv/

# Ubuntu Trusty (14.04) - You must use python3
sed -i~ 's/^#!\/usr\/bin\/env python$/#!\/usr\/bin\/env python3/' /usr/bin/unoconv

# Install and start Unoconv daemon.
ln -s /opt/masonsql/etc/unoconvd /etc/init.d/unoconvd
update-rc.d  unoconvd defaults
service unoconvd start
Tables
The queries for creating the ODT tables are in the/opt/masonsql/utility/sql/odt_report_tables.mql file.
Before applying the queries the owner name postgres must be changed to the new owner name my_db_owner_name.
Configuration
ODT Report Manager uses a couple of Apache configuration variables.Following is an example configuration in the
/opt/my_app_name/etc/apache2.my_app_name-devel.my_domain_name.conf file:
# Path of this apache configuration file
PerlSetVar ConfigPath /opt/my_app_name/etc/apache2.my_app_name-devel.my_domain_name.conf

# Temporary directory
PerlSetVar TmpDir   /opt/my_app_name/tmp

# Default report engine configuration:
# rep = old Report Manager
# odt = new ODT Report printed in odt format
# pdf = new ODT Report printed in pdf format
PerlSetVar DefaultReportEngine "pdf"

# ODT Reportman's access to DB
PerlSetVar ReportDBIconnect "dbi:Pg:dbname=my_db_name;user=report;password=MyReportPassword"

# Archive for templates
PerlSetVar InputFilesArchive "/opt/my_app_name/archive"
The
InputFilesArchive is used by Files Component. The component stores its files in the sub-directories which must be created:
cd /opt/my_app_name/archive
mkdir public
chown www-data:www-data public
mkdir odt_reports
chown root:www-data odt_reports
chmod 775 odt_reports
Without correct access permissions for the application's Apache config file the ODT Report Manager returns an error. Example of correctly set permissions:
-rw-r----- 1 root www-data 10182 Aug 19 12:13 /opt/my_app_name/etc/apache2.labs.leader.it.confIn order to apply changes, Apache configuration file must be reloaded:
/etc/init.d/apache2 reload
Functions and Permissions
Example setup of the ODT Reportman's permissions: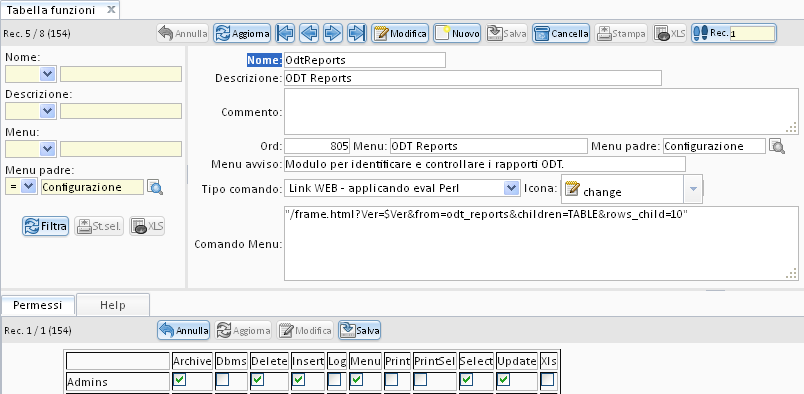
Reportman Installation
Reportman is a report manager developed with Delphi and Kylix, available for Windows and Linux. Unfortunately in the Linux version (Kylix) UTF-8 encoding can not be used, so it was necessary to abandon the use of Kylix version in favor of the Delphi version, which fortunately turns Wine environment.# Installing Wine apt-get install wine xserver-common PDF filter for optimization and to protect the document apt-get install qpdf # If you are connecting remotely with 'ssh -CX ...' echo -e "\n# Necessario per usare X da remoto\nX11UseLocalhost yes\n" >>/etc/ssh/sshd_config /etc/init.d/ssh restart # Package not necessary apt-get purge gnome-exe-thumbnailer cups-bsd cups-client cups-common libcupsimage2 libcups2Warning!: If you use already prepared and copied image (/opt/masonsql/reports/) from a previous installation, the next steps are not necessary!
Otherwise continue installation from a server with an available console X. I suggest to use Xrdp:
apt-get install xrdp xterm

# If you also use the Report Manager Designer you must also install a Desktop Manager,
# Otherwise you can not resize windows; for example:

apt-get install blackbox

# Wine Home is using the www-data user
HW="/opt/masonsql/report/www-data_home_dir"
[ -d $HW ] || cp -a /etc/skel $HW
chmod 700 $HW
chown -R www-data.www-data $HW
/etc/init.d/apache2 stop
usermod -d $HW  -s /bin/bash www-data
/etc/init.d/apache2 start
To connect remotely:
rdesktop -g1280x1024 -u www-data SERVERConnect to the server with the user using Reportman to continue with the Wine installation and Reportman:
# Make sure that wine is working by launching the Wine configuration:
winecfg

# Microsoft Font
winetricks corefonts


# ADOBE Installation - Microsoft License EULA !!!

#    http://msdn.microsoft.com/en-us/library/windows/desktop/ms693148%28v=vs.85%29.aspx
winetricks mdac28

# Installing Postgresql ODBC driver
wget http://ftp.postgresql.org/pub/odbc/versions/msi/psqlodbc_09_01_0200.zip
unzip psqlodbc_09_01_0200.zip
wine msiexec /i psqlodbc.msi
# Verification or configuring the ODBC connections
wine odbcad32.exe

# Download Windows version of the Reportman (complete package)
wget http://sourceforge.net/projects/reportman/files/Report%20Manager%20Designer/Designer%202.9/reportman2_9b.exe


# Reportman Installation
# Install only when needed: Command Line Tool and optionally Report Manager Designer (if you develop new reports),

wine reportman2_9b.exe

# Remove no longer needed files
rm psqlodbc_09_01_0200.zip  psqlodbc.msi  README.txt  reportman2_9b.exe  upgrade.bat

# look for the installation folder
REP="/opt/masonsql/report/www-data_home_dir/.wine/drive_c"
if [ -d "$REP/Program Files (x86)" ]
then
  REP="$REP/Program Files (x86)/Report Manager"
else
  REP="$REP/Program Files/Report Manager"
fi

# Configuration of an empty Report Manager connections
touch "$REP/dbxdrivers.ini"
chown www-data.www-data "$REP/dbxdrivers.ini"
touch "$REP/dbxconnections.ini"
chown www-data.www-data "$REP/dbxconnections.ini"

# If you installed Report Manager Designer to activate it run:
wine 'C:\Program Files (x86)\Report Manager\repmandxp.exe'
Edit | Attach | Print version | History: r27 < r26 < r25 < r24 | Backlinks | View wiki text | Edit wiki text | More topic actions
Topic revision: r27 - 07 Sep 2023, GuidoBrugnara